Growing your WordPress team? Need to give clients access to their website? Maybe you’re launching a membership site where hundreds of people will need accounts.
Adding users the wrong way can create security headaches or waste hours of your time. WordPress has built-in tools to handle this properly, whether you’re adding one person or managing hundreds.
This guide covers the five default user roles and what each one can do. You’ll learn two methods for adding users, manually through your dashboard or by letting people register themselves. We’ll also show you how to change permissions for existing users.
Let’s dive in.
Quick Steps: How to Add a New User to WordPress
Need the short version? Here’s how to add a new user:
- Log in to your WordPress dashboard
- Go to Users > Add New
- Fill in the username, email, name, and generate a password
- Choose their role (Subscriber, Contributor, Author, Editor, or Administrator)
- Click Add New User
That’s it. The new user can now log in with their credentials.
Want to understand what each role can do? Need to add multiple users at once? Or change someone’s permissions later? Keep reading for the full breakdown.
How to Add a User in WordPress
Got a small team helping with your website? WordPress makes it simple to bring new people on board through its built-in user system. No fancy plugins needed.
This approach works brilliantly when you’re managing a handful of users. Think small businesses where a few employees handle the website.
Here’s how it works.
Accessing the WordPress Admin Dashboard
The first step to adding a new user to your WordPress site is to access the WordPress admin dashboard. To do this, navigate to your website’s URL and append /wp-admin to the end.
For example, if your website is www.example.com, you would go to www.example.com/wp-admin.
Once you arrive at this login page, enter your admin username and password to gain access. After logging in, you’ll be greeted with the WordPress dashboard, which is the control center for managing your website, including adding new users.
Adding New Users to WordPress
Look for the Users option in your left sidebar menu. Click it then select Add New.
Fill in the User Details
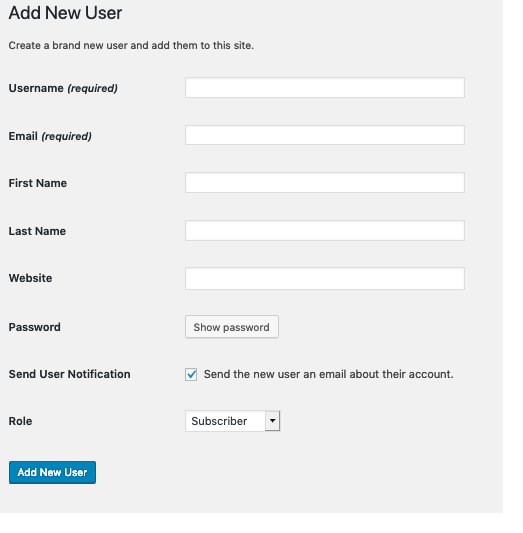
You’ll see a form asking for basic information:
- Username: Enter a unique username that’s memorable but professional.
- Email: Provide a valid email address for password resets and notifications.
- First and Last Name: Add these to help identify users in your dashboard.
- Password: Click Generate Password for a strong one, or create your own.
- WordPress shows a strength indicator, aim for that green “strong” rating. Strong passwords combine uppercase and lowercase letters with numbers and symbols, at least seven characters long. The system measures strength by checking for predictable patterns, so mixing in random characters makes accounts much harder to crack.
- Send Password: Tick this box to email login details directly to the new user, or leave it unchecked to share credentials yourself.
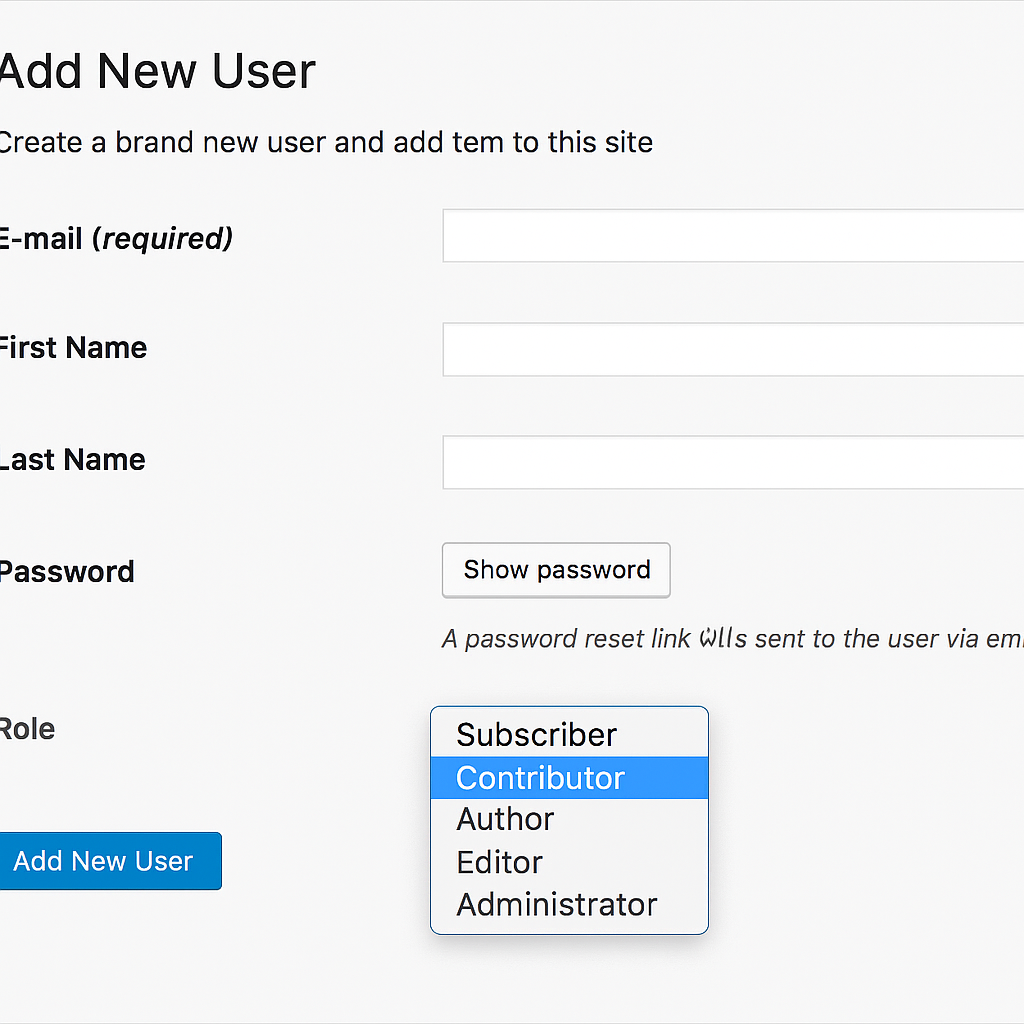
- Role: Select the appropriate access level from the dropdown. We’ll cover the different roles in the next section.
Save the New User
Click the Add New User button at the bottom. If you navigate away without clicking it, WordPress won’t save anything. A message will pop up at the top confirming the user has been added.
Once that’s done, the person can log in using their username and password.
Understanding the Different WordPress User Roles
Before you assign someone access to your website, you need to understand what they’ll actually be able to do. WordPress divides permissions into five default roles, each with different levels of control.
Think of it like giving someone keys to different rooms in your house. Some people get access to everything, while others can only enter specific areas. This system protects your website from accidental damage and keeps sensitive settings secure.
If you’re running a multi-site installation, there’s also a Super Admin role. These users manage the entire network of websites, whereas regular Administrators control just one site.
Administrator
This is the highest level of access. Administrators can do absolutely everything on your WordPress site.
They can install plugins, switch themes, modify settings, and delete any content. They can even remove other administrators, which means they could lock you out of your own website if they wanted to.
Only give this role to people you completely trust. They should also know their way around WordPress because one wrong click could break your site.
Editor
Editors focus entirely on content management. They can create, edit, publish, and delete posts from any user on your site.
What they can’t touch are your website settings, plugins, or themes. Many blogs and news sites use this role for their chief editors or content managers who oversee multiple writers.
Author
Authors have a narrower scope than editors. They can write, edit, and publish their own posts. They can also upload files like images and documents.
However, they can’t touch anyone else’s work. They also don’t have access to plugins, themes, or settings.
Some website owners use plugins to restrict authors even further, like limiting them to write only in specific categories. You can also extend their permissions to let them revise posts after publication if that suits your workflow.
Contributor
Contributors sit one step below authors. They can write and edit their own posts, but here’s the catch, they can’t publish anything.
An editor or administrator needs to review and approve their work first.
There’s one significant limitation: contributors can’t upload images or other media files. If you want contributors to include images, you’ll need to set up a file upload form. This lets them submit images separately, and then an editor can add them to the post during the approval process.
Subscriber
This is the most restricted role. Subscribers can’t create, edit, or publish any content.
With default WordPress settings, they can only manage their own profile and comment on posts more easily since their details are saved.
Where this role becomes useful is when you’re running a membership site or online course. Using a membership plugin or learning management system, you can create exclusive content that only subscribers can access.
Can I Customise User Roles in WordPress?
Yes, you can customize user roles in WordPress. While the default user roles cover most needs, you may find that your WordPress website requires specific permissions that are not covered by the standard roles.
To customize user roles, you can use various plugins available in the WordPress repository, such as User Role Editor.
These plugins allow you to create new roles, modify existing ones, and set specific permissions for each role.
Changing User Permissions for Existing Users
Sometimes you need to adjust someone’s access level after they’ve been using your site for a while. Maybe a contributor has proven themselves and deserves author status. Or perhaps you’re demoting someone who’s leaving your team.
WordPress makes this straightforward.
How to Manage User Permissions
Go to Users > All Users in your WordPress dashboard. You’ll see everyone who has access to your site listed there.
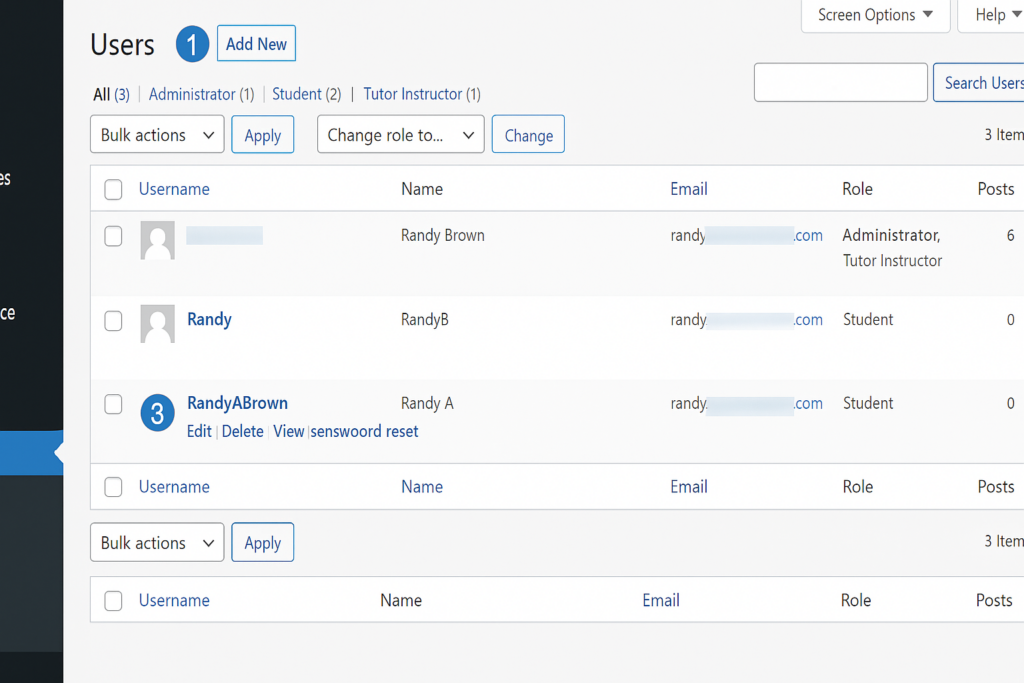
This screen works just like your posts or pages list. You can search for specific users, perform bulk actions, or edit individual accounts.
Hover your mouse over the user whose permissions you want to change. A menu appears beneath their name with options like Edit, Delete, and View. Click Edit.
Change Their Role
Scroll down until you see a section called Name. Below that, you’ll find a dropdown box labelled Role showing their current permission level.
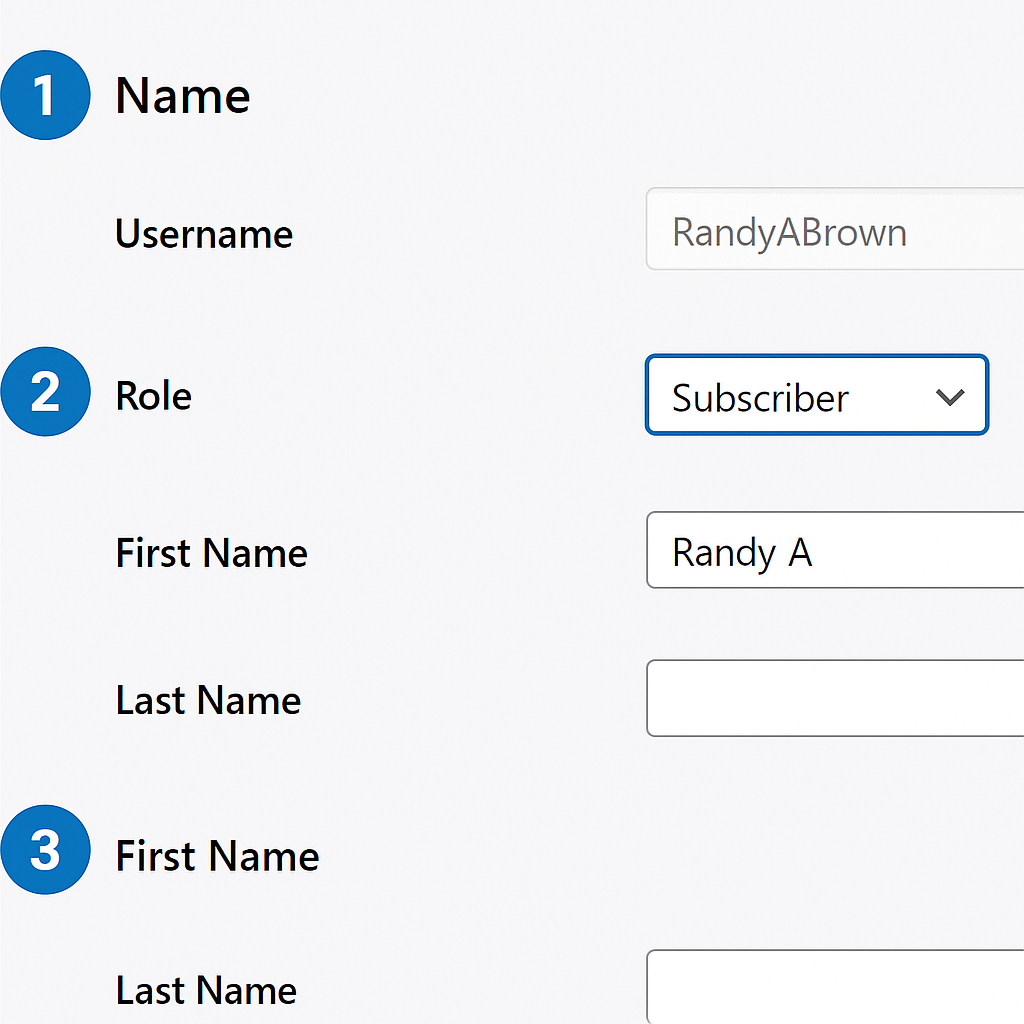
Click the dropdown to see all available roles. If you’ve installed membership plugins or other tools that create custom roles, those will appear here too. Your options might look different from a standard WordPress installation.
Select the new role you want to assign.
Save the Changes in User Permission Level
Scroll to the bottom of the page and click Update User. The person’s permissions change immediately.
They won’t receive a notification about this change, so you might want to let them know directly if it affects their workflow.
What Should I Do If I Need to Delete a User in WordPress?
If you need to delete a user from your WordPress site, the process is straightforward. Return to the “Users” section in the WordPress admin dashboard, find the user you wish to delete, and hover over their username.
You will see the option to “Delete.” Clicking on this will take you to a confirmation screen. The user will be removed from your WordPress site after confirmation.
What happens to a user’s content when I delete their account?
When you delete a user account in WordPress, you’ll have the option to attribute the user’s content to another user. If you choose to do this, the existing posts, pages, and other content created by the deleted user will be reassigned to the selected user account. However, if you do not reassign their content, all posts and contributions made by the deleted user will be permanently removed from your WordPress site. This is an important consideration, as it affects the overall content management and integrity of your site.
Can I restore a deleted user in WordPress?
Once a user is deleted from WordPress, there is no built-in option for restoring their account. However, if you have a backup of your WordPress database, you might restore the user account and their content from that backup.
It’s always a good practice to maintain regular backups of your WordPress site to avoid the permanent loss of user accounts and content. Using a plugin for backups can simplify this process and ensure you can recover important data when needed.
How to Automatically Add a New WordPress User via Site Registration
Adding users one by one gets tedious fast when you’ve got a large group to manage. Instead, you can open up registration and let people create their own accounts.
This works brilliantly for membership sites, online communities, or course platforms where you’re expecting dozens or hundreds of users. You set the parameters once, and everyone can sign up without you lifting a finger each time.
Turn On Registration to Add Users Automatically
Head to your WordPress admin panel and navigate to Settings → General.
Look for the ‘Anyone can register’ option and tick that box. Once you do this, a registration link appears on your login page.
Choose the Default Role for New Users to Your Site
Right below that checkbox, you’ll see a dropdown menu for ‘New User Default Role.’ This determines what permissions new registrants get automatically.
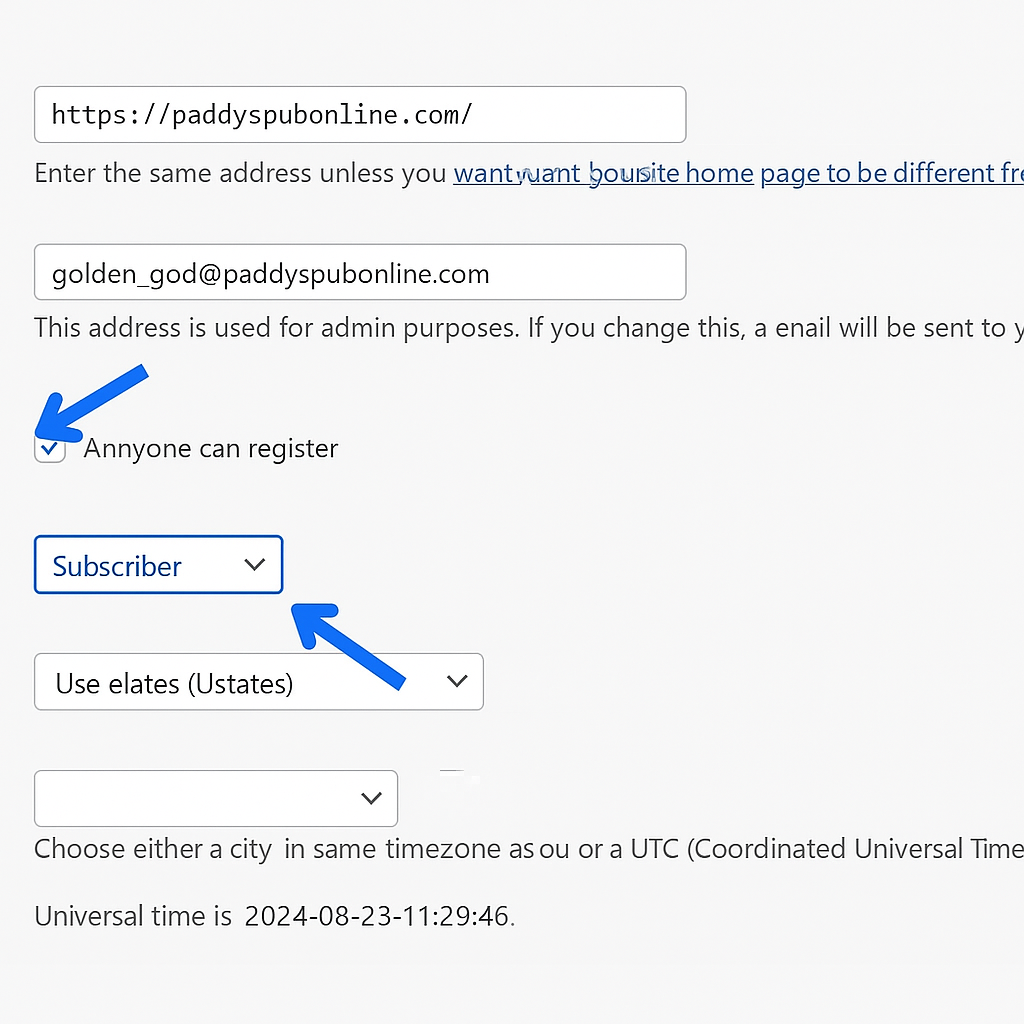
WordPress sets this to Subscriber by default, which is the safest option. Subscribers can’t publish content or access your site’s backend settings, so there’s minimal risk if someone creates an account with bad intentions.
You can change this to Contributor if you’re running a community blog where you want people to submit content for approval. Just think twice before going higher. Setting it to Author means that anyone who registers can immediately publish posts on your site.
Save Your Changes
Scroll down and click the Save Changes button. Your settings won’t take effect until you do this.
Now anyone can register by visiting your-site.com/wp-login.php. They’ll see a registration link that takes them to a signup form.
Set up an anti-spam service to filter out the rubbish. ReCaptcha, Jetpack (which includes Akismet), or Cleantalk all work well for blocking automated registrations. These tools add an extra verification step during signup that humans can pass but bots typically can’t.
How can I Create a Custom Registration Form for New Users?
If you want to create a custom registration form for new users on your WordPress site, you can use various plugins designed for this purpose, such as User Registration or WPForms.
These plugins allow you to design a tailored registration form that can include custom fields beyond the default username and email. You can add fields for first name, last name, or any other information you deem necessary. A custom registration form enhances the user experience and allows you to collect pertinent information during user registration on your WordPress site.
What Plugins Help With User Registration on WordPress?
Several plugins are popular for their features and ease of use in enabling user registration on your WordPress site. Some of the most popular options include User Registration, WPForms, and Ultimate Member. These plugins not only allow you to create custom registration forms but also provide functionalities for managing user roles and permissions, enhancing user profiles, and more.
Choosing the right plugin depends on your specific needs and the overall user experience you want to create on your WordPress website.
Wrapping Up
Managing WordPress users doesn’t have to be complicated. Whether you’re adding people manually or opening up registration, the key is choosing the right role for each person. Start with lower permissions and work up as trust builds.
Set up spam protection if you’re allowing self-registration. And remember, you can always adjust someone’s access level later if their responsibilities change.
Now go build that team.


